
Why is my doctor recommending a cecostomy/appendicostomy button?
- A cecostomy or appendicostomy procedure may be recommended for very severe constipation that is not responding to laxatives or other methods of bowel management. If constipation is causing severe pain or other potential bodily harm, the gastroenterologist may recommend a cecostomy.
- A cecostomy/appendicostomy can also be used to treat fecal incontinence (the inability to control bowel function).
- The following conditions can lead to severe fecal incontinence which might require a cecostomy:
- the anus does not allow material to pass properly (an anorectal malformation or Hirschsprung disease)
- spinal abnormalities, such as spina bifida
- a combination of the above conditions
- other neuromuscular conditions which affect the bowels
What is a cecostomy tube?
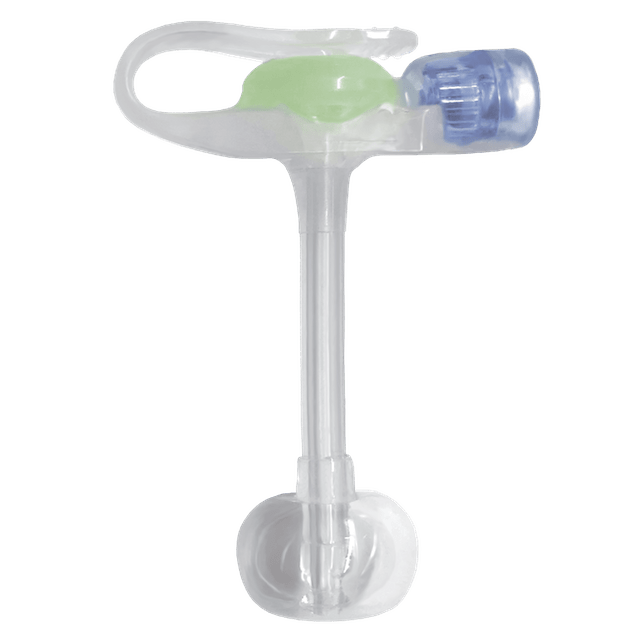
- A cecostomy tube, or C-Tube, (like the MiniACE®) is a thin tube that is placed into your large bowel through a stoma in your abdomen. The MiniACE® can either be placed directly into the cecum (cecostomy) or through the appendix and into the large intestine (appendicostomy, MACE). The MiniACE® allows you to put a flushing (irrigating) solution directly into your bowel so you can perform an antegrade continence enema (ACE).
What does ACE stand for?
- Antegrade Continence Enema.
What does MACE stand for?
- MACE: Malone Antegrade Continence Enema.
What is the difference between cecostomy and appendicostomy (MACE)?
- Cecostomy: A doctor will create a stoma (or opening) in the lower-right section of the abdomen; the stoma will travel from the abdominal wall to the first part of the large intestine, known as the cecum. A tube will be placed in the stoma. This tube is sometimes referred to as a cecostomy tube, or a C-Tube. AMT offers a low profile cecostomy tube called the MiniACE®. Once the stoma site is properly healed, irrigation fluid is delivered into the cecum through the C-Tube. This process, known as an Antegrade Enema, helps move stool out of the body through the rectum. Your healthcare team will help you determine which irritation fluid is right for you.
- Appendicostomy (also known as a MACE): Instead of creating a stoma in the lower-right section of the abdomen (as is done with the cecostomy procedure, above), the doctor will typically create a stoma opening at the belly button where it can be well-hidden. The doctor will then connect the appendix to the stoma/opening in the belly button. The appendix is a small organ that is located at the beginning portion of the large intestine (also known as the colon). By connecting the appendix to the stoma in the belly button, the doctor creates a channel from the outside of the body to the first part of the large intestine, known as the cecum. Once the stoma site is properly healed, irrigation fluid is delivered into the cecum. This process, known as an Antegrade Enema, helps move stool out of the body through the rectum. Your healthcare team will help you determine if you should use a catheter to perform your flushes or if you will need a device, such as the MiniACE®. Some patients with an appendicostomy/MACE will only need to insert a catheter/device when it is time to perform a “flush” (antegrade enema); this makes the appendicostomy/MACE a very discrete treatment option. Consult with your healthcare team to determine which type of irrigation solution is right for you.
What’s included in the MiniACE® Enema Button device kit?
- MiniACE® Legacy Kit Contents
- MiniACE® Enema Button
- 2-1221 (12” right angle connector with bolus adapter)
- A “For COLON” sticker to attach to the MiniACE®
- 5 ml slip tip syringe
- Introducer Stiffener
- Lubricating Jelly
- MiniACE® ENFit® Kit Contents
- MiniACE® Enema Button
- 2-1221-ISOSAF (12” right angle connector with ENFit® single adapter)
- A “For COLON” sticker to attach to the MiniACE®
- 5 ml slip tip syringe
- Introducer Stiffener
- Lubricating Jelly
How do I administer an antegrade enema (aka, ‘perform a flush’ or ‘irrigation’) with the MiniACE®?
- WARNING: This device has the potential to misconnect with small bore connectors of other healthcare applications. Only use this device to connect to compatible irrigation devices.
- Check everything in the kit for damage. If damaged, do not use. Obtain another package.
- Attach the irrigation set (Fig. 2) to the MiniACE® Button by lining up the dark line on the irrigation set connector with the dark line of the interlock on the MiniACE® Button (Fig. 1). Press irrigation set connector to insert into the MiniACE® Button. Make sure the irrigation set connector is fully pressed down and turn 3/4 to the right (clockwise) to lock the irrigation set into place.
- NOTE: Do not turn the connector past the stop point.
- Attach the irrigation set adapter (e.g. purple bolus adapter) to the connector of the irrigation delivery set. If using a bolus or Luer connector, firmly insert the connector while using a slight rotation into the irrigation set to lock in place. If using a rotating connector, firmly rotate the connector CLOCKWISE into the irrigation set to lock in place, but do not force the set to lock. Be sure the white pinch clamp is closed until you are ready to begin the irrigation/enema (the “flush”).
- WARNING: Only tighten by hand. Never use force or a tool to tighten a rotating connector. If this is not done correctly, the connector may crack, leak, or have other problems.
- WARNING: Be sure the MiniACE® is connected to an irrigation port only and NOT to an IV set.
- WARNING: If the irrigation set is not placed and locked the correct way, it might leak. When twisting the connector, hold the MiniACE® Button in place so the button does not twist while placing the irrigation set. Do not try to put the irrigation set connector into the balloon inflation port. This may cause the balloon inside to lose water and the tube may fall out or lead to the balloon breaking if the wrong solution is put into the balloon.
- Once connected, open the pinch clamp to let the fluid which your healthcare professional ordered to flow into the button.
- When irrigation is finished, flush through the irrigation set with 5-10 ml water, or with an amount recommended by your healthcare provider. Use a catheter tip or ENFit® syringe. Remove the irrigation set by holding the MiniACE® Button in place, hold the irrigation connector, twist and turn 3/4 to the left (counterclockwise) to unlock, and gently remove the irrigation set from the MiniACE® Button. Snap the Bowel MiniACE® Button plug in to keep the inside of the button clean.
- The irrigation set should be washed with soap and water and rinsed well.
-
- WARNING: In case of fever, the belly swelling up, infection, blockage, or damage to the skin at the stoma, patients should see their healthcare provider immediately.
- WARNING: DO NOT PLACE ANY FOREIGN OBJECTS INTO THE IRRIGATION PORT.
- WARNING: If using a transition connector, be sure that it is not connected to an IV set before use.
- WARNING: When using a bolus style irrigation set, this device can also fit other sets such as a breathing system, a blood pressure cuff, and other monitor connectors.
- Irrigation set tubing can be secured to the skin or to other surfaces using AMT’s tube securement device, the CINCH®. The CINCH® keeps tubing lines organized and helps avoid inadvertent pulls and tugs on the tubing which can make the “flush” more comfortable. Refer to the Accessories section of the AMT One Source™ app for more information.
When should I replace the MiniACE®?
- For best performance, it is recommended that MiniACE® Enema Button be changed every 3 months, or as often as suggested by your healthcare professional. Changing the tube every 3 months will help prevent the tube from having unexpected problems. Each tube will last a different amount of time depending on each patient. The typical amount of time a MiniACE® button can last is about 1-6 months.
How do I replace the MiniACE®?
- CAUTION: PRIOR TO PLACEMENT, PLEASE CHECK ALL CONTENTS OF THE KIT FOR DAMAGE. IF THE PACKAGE IS DAMAGED OR THE PACKAGE IS OPEN, DO NOT USE THE TUBE.
- CAUTION: DO NOT TRY TO REPLACE THE MINIACE® OR CHECK FOR THE RIGHT PLACEMENT UNTIL FIRST TALKING WITH YOUR HEALTHCARE PROFESSIONAL.
- Select the correct MiniACE® Button size for placement.
- NOTE: When replacing a tube, the stoma length should be measured from time to time to be sure the correct MiniACE® Button size is being used. If a patient’s size/weight has changed since the button was placed, if it fits too tight or loose, or it has been over six months since the stoma was last measured, you should speak to your healthcare professional to be sure the tube length does not need to be changed.
- Before placing the MiniACE® Button, inflate balloon through the balloon inflation port (see Fig 3) using a Luer slip syringe with distilled water or sterile water to the recommended fill volume. The recommended fill-volume is printed above the balloon inflation port of the tube and can be referenced in the chart in Table 1. Remove the syringe and check the balloon by gently squeezing the balloon to check for leaks. Visually look at the balloon carefully to make sure it is symmetrical. Make sure that the button is the right size and is what the healthcare professional ordered. Put the syringe back into the balloon port and take out all of the water from the balloon after it has been checked.
- Put the tip of the tube into the water soluble lubricant. DO NOT USE MINERAL OIL OR VASELINE. Put the blue “golf tee” or introducer into the irrigation port if increased stiffness is needed during placement (see Fig 4).
- Gently guide the tube through the stoma and into the colon until the tube is flush to the skin.
- Remove Introducer (if used in step 3).
- Fill up the balloon with sterile or distilled water according to the fill volume in the chart in Table 1 or what is printed on the balloon port.
- Gently lift back on the external bolster of the device and check for signs of any leakage coming from around the tube.
- To reduce risk of misconnection, place the provided tag on the button strap after device placement.
- NOTE: IF LEAKAGE IS OBSERVED, INCREASE BALLOON VOLUME BY 0.5-1 ml. DO NOT EXCEED MAXIMUM FILL VOLUME.
The MiniACE® feels loose/tight against the skin; what should I do?
- If the MiniACE® feels too loose or too tight, one option is to adjust the volume of water in the balloon (always consult a healthcare professional before adjusting the volume of water in the balloon). Table 1 shows the minimum, recommended, and maximum volume of water for each French size of the MiniACE®.
- Be sure to check the current balloon volume before making any adjustments. To do this, insert an empty slip tip syringe into the MiniACE® balloon fill valve and pull back on the plunger (Fig. 1). Be sure to keep one hand on the device so it stays in place. Use the volume indicators on the syringe to determine how much water you just removed from the balloon and replace it with new water. If you do not have access to fresh water, you can re-fill the balloon with the water that is currently in the syringe. Compare the amount of water you removed from the MiniACE® to Table 1. If the MiniACE® fit is too loose, increase the amount of water in the balloon, but stay within the recommended amounts listed in Table 1. One option is to add an additional 0.5 ml of water to the balloon and see if that improves the fit. For example, you can fill the balloon with 3.0 ml of water instead of 2.5 ml of water. If the MiniACE® fits too tight, decrease the amount of water in the balloon, but stay within the recommended amounts listed in Table 1. One option is to reduce the water volume by 0.5 ml and see if that helps. For example, you could fill the balloon with 2.0 ml of water instead of 2.5 ml.
- If the MiniACE® does not properly fit, even though you increased or decreased the volume of water in the balloon, the stoma may need to be re-measured for a longer or shorter MiniACE® C-Tube.
- The MiniACE® should be able to turn easily without rubbing the patient’s skin. If the MiniACE® does not turn easily or if there is redness/bleeding at or around the stoma, call your healthcare provider. The stoma may need to be re-measured for a longer MiniACE®
- Each time the tube is changed, the stoma length should first be re-measured.
- NOTE: The MiniACE® should be able to move a little from side-to-side without too much force from the patient’s skin. If the MiniACE® does not move or, if you see redness/bleeding at the stoma or the area directly underneath the MiniACE®, call your provider. The stoma may need to be re-measured for a longer MiniACE®.
I think the MiniACE® has a clog; what should I do?
- Fill a catheter tip syringe with warm water (always use a 30 ml – 60 ml syringe). Insert the tip of the syringe into the purple bolus adapter of the irrigation set. Gently push warm water through the irrigation set until all of the air is removed from the tubing. Close the pinch clamp on the irrigation set and then attach the Glow Green™ connector to the MiniACE® device.
- CAUTION: Never use a syringe less than 30 ml to attempt to clear a clog (such as 12 ml), as smaller syringes (such as 10 ml) can create high pressure very quickly and may negatively impact the device.
- Release the pinch clamp and gently push and pull the syringe plunger to free the clog. It may take several cycles of pushing / pulling the plunger to clear the clog.
- If you are unable to remove the clog, repeat steps #1-2 with a new solution of warm water. Pulling and pushing on the syringe plunger will likely break up the clog.
- If the clog cannot be removed, contact your healthcare professional, as the tube may need to be replaced.
- CAUTION: Do not use too much force or pressure to try to clear the clog. This can cause the tubing to break or split. Do not put any objects into the tube except the irrigation set.
Why is there a “For Colon” sticker attached to the irrigation set?
- AMT must label our irrigation sets with a “For Colon” sticker, per FDA guidance. Your healthcare provider may have given you a “For Colon” sticker for your device; AMT provides this label in accordance with FDA guidance.
Does AMT sell Enema Bags (bags for my enema fluid solution)?
- No, AMT does not sell Enema Bags.
What sizes does AMT offer in the MiniACE®?
- AMT offers 10F, 12F, and 14F MiniACE® devices with stoma length ranging from 0.8 cm to 10.0 cm.
What types of Irrigation sets does AMT offer?
AMT sells bolus, right-angle irrigation sets in boxes of 10.
- 2-1221 (12″) – Box of 10, non-sterile.
- 2-2421 (24″) – Box of 10, non-sterile.